This adorable tp roll snail craft is so simple to make and is a great way to keep the kids entertained. Each snail turns out cool and unique which makes this a fun craft idea for at home and for groups too!
Here’s what we used
Cardboard Tp roll
Coloured Card
Pipe cleaner
Googly eyes
Scissors
Glue
How to make our tp roll snail craft.
Cut out a strip of coloured card the same height as the tp roll and long enough to cover it. Glue the card around the roll.
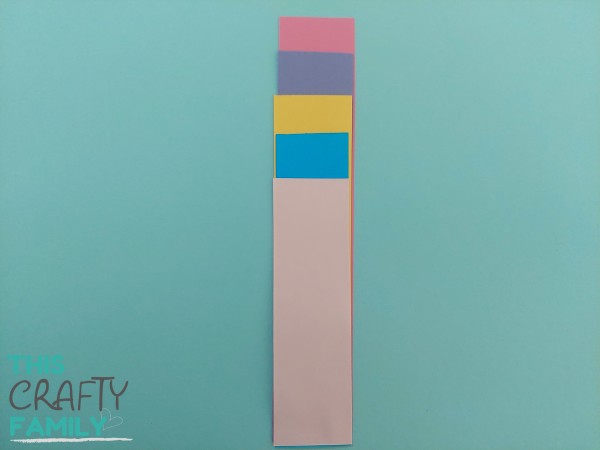
Cut out 5 strips of paper, they should be roughly equal in width but varying length. We initially cut ours to them same length and then dropped them by Two cm each time to give us strips that were 20cm, 18cm,16cm,14cm and 12cm.
Line up and glue all of the strips together at one end.
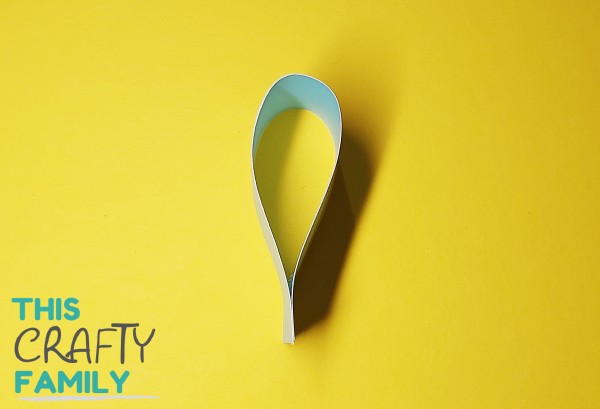
then line up and glue together the other end of the strips.
Stick the two ends of strips together to make the circular snail’s shell. then attach the shell at one end of the tp roll.
Finally take a pipe cleaner and fold it in half to make a v shape. Glue the folded end of the pipe cleaner into the top inside of the tp roll and then add a Googly eye onto each end of the pipe cleaner. Add some glue around the inside of the head end of the roll and then pinch it together to seal it. Once dry your cute tp roll snail craft is finished!
This free nature scavenger hunt printable is a great way to get outdoors with the kids and celebrate the warmer weather! We took our copies to the local lake and the kids had a great time running around looking for the different items on the list. We made two versions, one with labels for my youngest and one with blank labels for my eldest to fill out himself, it was a great way to encourage him to practise his writing and to make it extra fun we took a camera so they could take turns taking pictures of their findings!
This super cute paper flower craft is so sweet and simple to make and is a perfect way to welcome in the spring season! Not only do these look great on display but they also make a cute art piece for children to make and gift!
Here’s what we used
Coloured card
White, green and yellow paper
Scissors
Glue
How to make our paper daisy craft
Cut out several equal sized strips of white paper. Take six strips and glue them together in a flower like shape on to your paper – remember to only glue the centre and leave the ends of the strips loose.
Take the end of each strip, bring it inwards and glue it down in the middle of the flower.
Cut out and glue on a circle to make the centre of the flower.
Repeat the previous steps to make the desired amount of daisies.
Cut out a strip of green paper to make the stem and then add some green leaves.
Next, Cut out a strip of paper a few cms longer than the bottom of the picture and on one side cut out several triangles to make some spiky grass. Fold a small tab on each side of the grass and then use the tabs to glue the grass onto the picture. Once dry your little one’s cute paper daisy craft is ready to display!
These adorable paper heart garlands are so sweet and simple and are perfect for children to make and gift on special occasions – they also make great budget friendly party decor too!
Here’s what we used
Coloured paper/card
Scissors/paper cutter
Glue
String
Hole punch
How to make a paper heart garland.
Start by cutting out the paper strips that you will use for your heart. We used four for each side. Cut out the strips for one side first, each strip should be the same width but you’ll need to cut each strip to a different length as you can see above. For out largest strip we used the length of a piece of a4 paper and then we cut each one down by a couple cms each time. Once you have your four strips cut out four identical ones to make the other side of the heart.
Take the smallest strip and add a dab of glue to one end pull the other end round into a tear shape and pinch the two ends together until stuck.
Next take the second shortest strip and again add glue to one end. Attach it to the point of your first tear drop shape and then take the other end and glue it down onto the other side of the tear drop to create a second layer.
Repeat this process with the remaining strips you have for this side
Repeat the previous steps to create a second tear drop shape.
To hang your hearts as part of a garland or as an individual decoration; Cut out a small rectangle strip the same width as the strips you used to make your heart and punch a hole at one end.
Glue the two sides of the heart together with the hanging strip to dry. Repeat this process to make as many hearts as you need, once dry use the hole punched part of the strips to thread the strings through and create your paper heart garland!