These simple penguin heart cards are just adorable! Each card only uses a small amount of resources which makes them the perfect craft for groups as well as to make at home to gift to family and friends.
Here’s what we used
Black card
White/yellow paper
Googly eyes
Scissors
Glue
How to make our penguin heart cards
Start by taking your black piece of card and folding it in half. Cut the card down into into a circular shape ensuring that part of the fold of the card is left intact. Cut across the bottom of the card to create a flat edge so that it can stand freely.
Cut out a heart shape to make the penguin’s white belly and glue it down in place towards the bottom of the penguins body.
Cut out a diamond shape from your yellow paper and fold it in half to make the penguin’s beak. Glue the beak in place just above the belly.
Finally add two Googly eyes to complete your card and once it’s fully dry you’re ready to add your special festive message inside!
These easy paper roll birds are perfect as a fun spring craft for at home or for preschools too! Each bird turns out so beautiful and unique and children can switch up their own designs to make their favourite kinds of birds. My kids really enjoyed making these. We looked at pictures of different birds on google and tried to copy them – we made a robin, a peacock and some parrots. I just love how these turned out!
Heres what we used
Paper roll
Paints & paintbrush
Googly eyes
Coloured paper
Scissors
Glue
Feathers
How to make these cute paper roll birds
Start by taking the paper rolls and cutting them down to the desired size. Now it’s time to coat them in the coloured paint before putting them aside to dry.
Once the paper rolls are dry, cut out two little bird’s feet and glue them to the bottom of the roll.
Now its time to give the birds a face! Add two eyes, a beak and any other facial features.
Finish off the paper roll birds by adding some feathers to Make a tail and optionally some wings! How adorable are these cute little critters?
This sweet and easy little CD penguin craft is so simple to make and a great way to recycle old cds or dvds. We’ve got ours hung up in the window so that it reflects the light and It looks so cute as it twirls around. My little boy really loves making any kind of animal crafts, he’s always been fascinated with creatures big and small. He loves his little penguin and wants to make a whole bunch of CD animals for his window and as we make them we will share them with you too!
Heres what we used
An old CD
Funky foam
Scissors
PVA Glue
Hole punch
String
How to make our CD penguin
Take your foam and cut out a circle shape for the head and two oval wings. Glue the shapes down in position on your CD and then leave to dry slightly.
Cut out two round eyes, a triangle beak and two little flippers. Stick the eyes and beak down on the head piece and the flippers on the bottom of the CD then leave to dry completely.
If you want to use your penguin as a hanging decoration (they look fab spinning around and reflecting the light!) Simply punch a hole at the top and tie a loop of string through.
How adorable is this cute paper penguin craft?! My little guy and i loved them so much that we made ourselves a little penguin family! We’ve had so much fun making these little cone crafts and have came up with so many fun designs to share with you all. I’m sharing this one first because they’re my son’s absolute favourite – which is no surprise as he loves animals of all kinds!
You will need
Thick construction paper or card (we used orange, white and black)
Scissors
Glue
Sticker eyes (optional)
To make the body
Take a black piece of A4 paper and fold it in half to make a card shape. Then, take a pencil and draw a gradual curve starting from just above the centre of your fold line to the bottom right corner (you’ll need to make sure the curve isn’t too sharp or it won’t match up when folded).
Cut out your shape.
Fold your shape in half and trim off any excess to make sure both sides are even.
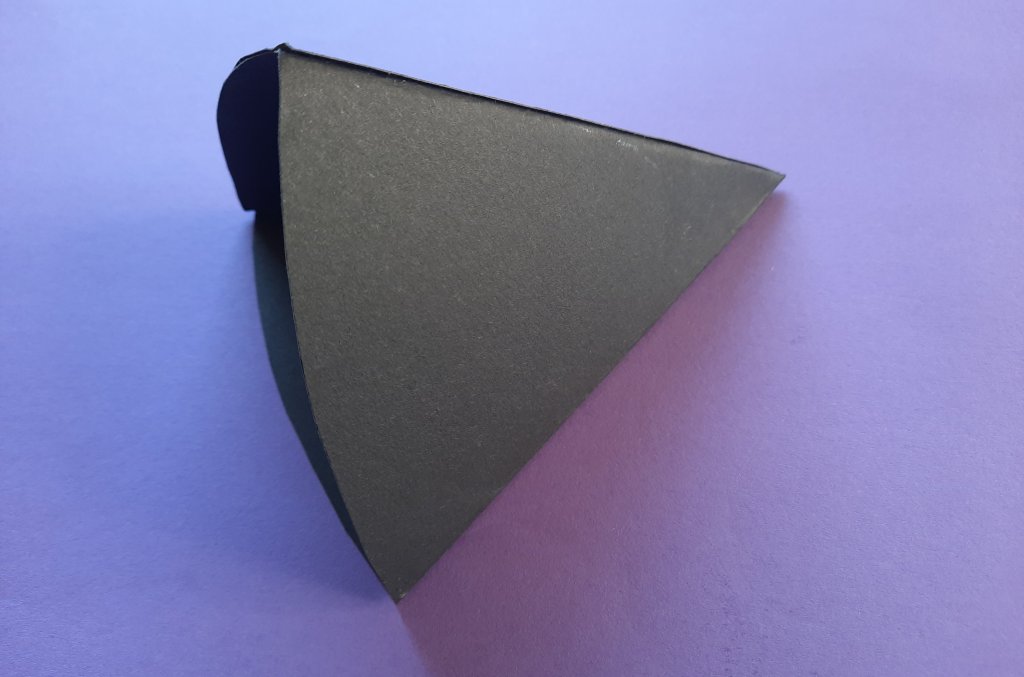
Open up your shape to reveal your 4 sections Cover one of your end sections in glue…
and then pull it round and stick it down on the back of your other end section to create a triangular cone.
To make the belly, head and flippers.
Cut out a white arch shape and glue it down centrally on your cone, this will make your penguin’s white belly.
Cut out a black circle for the head. Now you’ll need to give your penguin two eyes. We used eye stickers but if you don’t have these you can simply cut out some white circles and draw on the eye details. You’ll also need to stick down a beak, to make it, simply fold a piece of orange paper in half and using the fold line as the base cut out a triangle to give you a folded diamond shape. Glue one triangle half down on the face and leave the other half free as you can see above.
Next cut out two flipper shapes
and curl one end around a pencil.
The final feature that you will need to make is the feet. Make sure you leave enough room at the back of the feet to fold a tab that you can use to glue them on you penguin – just like you can see above!
Now it’s time to glue all your pieces together! Glue the head down at the top point of your cone. Add a flipper to each side and then using your folded tabs, secure the feet on the inside of your cone and fold them outwards. Your adorable penguin is finished!
It’s been a while since I’ve posted, Cold and flu season combined with Christmas and new year has made for a very busy few weeks. But now we’re back in the swing of things and my son and I have been cooking up some fun new crafts to share with you; Starting with these cute handmade penguin bookmarks!
You will need
Popsicle sticks Pom poms Googly eyes Yellow paper Black foam (or card) Coloured pens or paints Stickers (optional)
Using paints or felt tips, decorate your popsicle stick and put it aside to dry.
Now to make your penguins face! To make the beak; take your yellow paper and fold it in half, using the fold as the base cut out a small triangle. You should end up with a folded diamond shape. Glue one half of the triangle to your black Pom Pom and leave the other side free. Then glue two googly eyes just above where you stuck the beak. Put aside to dry.
Now take your black Foam (or card) and cut out two wing shapes. Glue them centrally at the top of your popsicle stick.
Glue your penguin’s head on top of the wings. optionally add some stickers or decorations to your stick and your penguin bookmark is finished!
like these Handmade Penguin Bookmarks? why not check out this Paper plate penguin?